The following covers about 14 years of work. Rather than present the images in strictly chronological order, I’ve broken them into thematic groupings in order to highlight the continuity of certain ideas, materials and approaches over time. These groups are, however, approximate and therefore cross over and break down at certain points. Hopefully this approach will be more illuminating than confusing.
A note on titles: I generally do not title my work. One quality I strive for is a kind of phenomenological dead-pan which I find titles tend to undermine (a title implies a wider context within which the work is explicable). For the purposes of the following image index, however, I may refer to a work by the thematic grouping in which it can be located (i.e. “Cast Rubber” #8). This should, however, not be understood as the piece’s title.
Friday, March 6, 2009
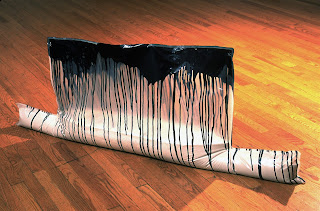
Cast Paint
Originally coming from a painting background, I’ve been drawn again and again to ways of treating physically, even literally, the inherent balance between real and virtual space in painting. An early form of this was to treat paint itself as a material that could be cut, assembled and even used structurally.
Images 1-4 show some freestanding works using cast acrylic paint in the above way. The remaining images show later wall works that forgo the stitching used to assemble the earlier pieces. Instead, these pieces are seamless: each color is a layer present throughout the piece, only surfacing and becoming visible at certain points (this is most apparent in the detail image “Cast Paint 6”). Also, in these wall pieces the color reflected onto the wall plays an integral role in the overall “image”.


Images 1-4 show some freestanding works using cast acrylic paint in the above way. The remaining images show later wall works that forgo the stitching used to assemble the earlier pieces. Instead, these pieces are seamless: each color is a layer present throughout the piece, only surfacing and becoming visible at certain points (this is most apparent in the detail image “Cast Paint 6”). Also, in these wall pieces the color reflected onto the wall plays an integral role in the overall “image”.
1) Cast acrylic paint, plywood, thread.
10”x8”x5”. 1994

2) Cast acrylic paint, plywood, thread.
14”x14”x16.5”. 1994

3) Cast acrylic paint, brick, thread.
4.5”x6”x4”. 1994

4) Cast acrylic paint, brick, thread.
4”x6”x4”. 1994

5) Cast acrylic paint (one piece).
38”x22”x1.25”. 1995-96

6) Cast acrylic paint (one piece).
38”x22”x1.25”. 1995-96 (detail)

7) Cast acrylic paint (one piece).
38”x30”x1.25”. 1995-96

8) Cast acrylic paint (one piece).
38”x30”x1.25”. 1995-96 (detail)

9) Cast acrylic paint (one piece).
42”x156”x1.25”. 1995-96

10) Cast acrylic paint (one piece).
42”x156”x1.25”. 1995-96 (detail)

Bags and Slipcovers
Returning to around the time of the floor works above, the first four images below represent my early attempts at using plaster as a “support” for other materials. For these pieces (images 1-4 below), I sewed a shaped “bag” made of plastic sheeting (and, in the case of image 1 and 2 dripped with paint) and then filled it with plaster until it was self-supporting. In images 3 and 4, the color is pools of paint I poured after the plaster was dry.


In the following two pieces, the plaster structure was cast in holes dug in the ground (accounting for their color and texture). While the plaster was setting, I added the wooden “legs”. The cover is a sewn envelope made of vinyl, reinfored with wire, and held up by a dowel mast.


The following piece was made during the same summer as the above two pieces and is both an anomaly as well as a transition to the later work below. It’s become an iconic work for me and informs (and haunts) much of the work that’s come after it.

Furthering the “slipcover” idea of the previous three pieces, the following five images show work made while in residence at the Sharpe Foundation during 1996-97.


Evolving out of the above works and moving back onto the wall, the remaining pieces each share the same basic features: A “support” made of horizontally joined sheets of foam insulation, which may or may not then be painted (it is either pink or blue when unpainted); a poured hydrocal form set into the foam surface; a sewn vinyl cover, held away from the surface of the foam by the hydrocal relief, onto which paint may then be variously applied (more thickly in images 13 and 14; more lightly with an air-brush in the others); a hanging system which allows the works to “hover” approximately 2” from the wall. The last piece, made for a show at the Worcester Art Museum, is the largest (almost 9’x17’) and has no painting on the surface of the foam (and just a haze of air-brushed paint on the surface of the vinyl).


1) Plastic sheeting, plaster, paint, thread.
22”x65”x8”. 1995

2) Plastic sheeting, plaster, paint, thread.
22”x65”x8”. 1995 (detail)

3) Plastic sheeting, plaster, paint, thread.
21”x132”x8”. 1995

4) Plastic sheeting, plaster, paint, thread.
21”x132”x8”. 1995 (detail)

In the following two pieces, the plaster structure was cast in holes dug in the ground (accounting for their color and texture). While the plaster was setting, I added the wooden “legs”. The cover is a sewn envelope made of vinyl, reinfored with wire, and held up by a dowel mast.
5) Vinyl, plaster, wood, wire, thread.
32”x36”x6”. 1995

6) Vinyl, plaster, wood, wire, thread.
36”x42”x6”. 1995

The following piece was made during the same summer as the above two pieces and is both an anomaly as well as a transition to the later work below. It’s become an iconic work for me and informs (and haunts) much of the work that’s come after it.
7) Vinyl, hydrocal, wood, thread.
40”x46”x20”. 1996

Furthering the “slipcover” idea of the previous three pieces, the following five images show work made while in residence at the Sharpe Foundation during 1996-97.
8) Vinyl, hydrocal, thread.
23”x27”x4”. 1997

9) Vinyl, hydrocal, thread.
24.5”x21”x2.5”. 1997

10) Vinyl, hydrocal, thread.
24.5”x21”x2.5”. 1997 (reverse)

11) Vinyl, hydrocal, thread.
34”x29”x3”. 1997

12) Vinyl, hydrocal, thread.
34”x29”x3”. 1997 (reverse)

Evolving out of the above works and moving back onto the wall, the remaining pieces each share the same basic features: A “support” made of horizontally joined sheets of foam insulation, which may or may not then be painted (it is either pink or blue when unpainted); a poured hydrocal form set into the foam surface; a sewn vinyl cover, held away from the surface of the foam by the hydrocal relief, onto which paint may then be variously applied (more thickly in images 13 and 14; more lightly with an air-brush in the others); a hanging system which allows the works to “hover” approximately 2” from the wall. The last piece, made for a show at the Worcester Art Museum, is the largest (almost 9’x17’) and has no painting on the surface of the foam (and just a haze of air-brushed paint on the surface of the vinyl).
13) Foam insulation, hydrocal, vinyl, acrylic paint, thread.
52”x40.5”x6.5”. 1999

14) Foam insulation, hydrocal, vinyl, acrylic paint, thread.
52”x40.5”x6.5”. 1999 (detail)

15) Foam insulation, hydrocal, vinyl, acrylic paint, thread.
43.5”x37”x6.5”. 1999

16) Foam insulation, hydrocal, vinyl, acrylic paint, thread
39”x38.5”x6.5”. 1999

17) Foam insulation, hydrocal, vinyl, acrylic paint, thread.
50.5”x39”x6.5”. 1999-00

18) Foam insulation, hydrocal, vinyl, acrylic paint, thread.
105”x202”x8”. 2000

Cast Rubber
Jumping back in time again, the following pieces evolved out of simple marker drawings I was making which both suggested and undermined simple spatial illusions (mostly by the unvarying thickness and consistency of the marker line). Liquid rubber was mixed with pigment and poured into simple molds made by dragging dowels through clay. With the exception of image 3 which hangs by dowels inserted into the rubber itself, the pieces all hang over nails driven into the wall.


1) Cast rubber, pigment.
33.5”x26”x.75”. 1997

2) Cast rubber, pigment.
27”x30”x.75”. 1997

3) Cast rubber, pigment.
26”x28”x.75”. 1997

4) Cast rubber, pigment.
45”x40”x.75”. 1997

5) Cast rubber, pigment.
68”x71”x1”. 1997

6) Cast rubber, pigment.
48”x40”x1”. 1997

7) Cast rubber, pigment.
61”x70”x1”. 1997

8) Cast rubber, pigment.
56.5”x88”x.1.5”. 1998

Styrofoam and Plaster
This section charts the evolution (so far) of works which combine plaster and insulating foam in various ways. Technically, the last six pieces in the “Bags and Slipcovers” section also belong here. So much for categories.
The first seven images all involve variations on the same process: First, I cut channels in the surface of the foam with a router; I then pour plaster into these channels and allow it to set. The piece is then flipped over and the process is repeated on the other side(s). When all sides are done, areas of foam may be cut away to further reveal the plaster structure. In images 1, 4 and 5, the foam has been left unpainted. In images 2,3,6 and 7 the foam was painted before being cut into. In images 6 and 7 two separate sections have been slotted together.


The first seven images all involve variations on the same process: First, I cut channels in the surface of the foam with a router; I then pour plaster into these channels and allow it to set. The piece is then flipped over and the process is repeated on the other side(s). When all sides are done, areas of foam may be cut away to further reveal the plaster structure. In images 1, 4 and 5, the foam has been left unpainted. In images 2,3,6 and 7 the foam was painted before being cut into. In images 6 and 7 two separate sections have been slotted together.
1) Foam insulation, hydrostone.
30”x25”x4”. 1997

2) Foam insulation, acrylic paint, hydrostone.
29”x49”x4”. 1998

3) Foam insulation, acrylic paint, hydrostone.
29”x49”x4”. 1998 (detail)

4) Foam insulation, hydrostone.
30.5”x96”x6”. 1998

5) Foam insulation, hydrostone.
30.5”x96”x6”. 1998 (detail)

6) Foam insulation, acrylic paint, hydrostone.
48”x96”x48”. 2003

7) Foam insulation, acrylic paint, hydrostone.
48”x96”x48”. 2003 (detail)

The pieces in images 8,9 and 10 grew out of those in “Bags and Slipcovers” 12-17. Abandoning the slip-covers, I focused on developing the relationship between the plaster and foam. In these pieces, the plaster form is larger and more ornate (resembling cave formations etc.). Also, the plaster is physically separate from the foam and hangs directly on the wall. The foam panel (on which many layers of acrylic glaze are applied and allowed to drip) is then placed over the plaster through a hole cut in the foam’s surface. As with many of the works in this sample, the terms of image/ground; support/surface; picture/thing become confused and interchangeable.
8) Foam insulation, hydrocal, acrylic paint.
79”x69.25”x11”. 2001

9) Foam insulation, hydrocal, acrylic paint.
79”x69.25”x11”. 2001 (detail)

10) Foam insulation, hydrocal, acrylic paint.
85.5”x70”x9”. 2001

Assorted Wall Work
The first four images show two pieces made by layering sheets of translucent drafting mylar with strips of surveying tape.


Developing out of the earlier cast paint pieces, these paintings on clear vinyl were another attempt to allow marks expressed frontally to interact with their shadows and colored reflections, making a painting that’s part concrete and part ephemeral.


The remainder of these images show works made by pouring pigmented silicone onto first one side and then the other of sheets of translucent mylar. Starting with image 13, the rubber starts taking on a more structural role as the pieces no longer hang from the mylar but from the lobes of silicone that extend beyond the mylar’s edge. Image 13 shows the only piece to use more than one layer of mylar.


1) Frosted Mylar, surveying tape, thread.
24”x24”. 1996

2) Frosted Mylar, surveying tape, thread.
24”x24”. 1996 (detail)

3) Frosted Mylar (2 layers), surveying tape, thread.
24”x24”. 1996

4) Frosted Mylar (2 layers), surveying tape, thread.
24”x24”. 1996 (detail)

Developing out of the earlier cast paint pieces, these paintings on clear vinyl were another attempt to allow marks expressed frontally to interact with their shadows and colored reflections, making a painting that’s part concrete and part ephemeral.
5) Acrylic paint on vinyl.
22”x19”. 1997

6) Acrylic paint on vinyl.
22”x19”. 1997 (detail)

7) Acrylic paint on vinyl.
47.5”x42”. 1997

8) Acrylic paint on vinyl.
47.5”x42”. 1997 (detail)

The remainder of these images show works made by pouring pigmented silicone onto first one side and then the other of sheets of translucent mylar. Starting with image 13, the rubber starts taking on a more structural role as the pieces no longer hang from the mylar but from the lobes of silicone that extend beyond the mylar’s edge. Image 13 shows the only piece to use more than one layer of mylar.
9) Silicone rubber, mylar, pigment.
20.5”x22”. 1999

10) Silicone rubber, mylar, pigment.
23.5”x33.75”. 1999

11) Silicone rubber, mylar, pigment.
32”x36”. 1999

12) Silicone rubber, mylar, pigment.
46”x62”. 1999

13) Silicone rubber, mylar, pigment.
55”x55”. 2001

14) Silicone rubber, mylar, pigment.
56”x43”. 2001

15) Silicone rubber, mylar, pigment.
54”x62”. 2001

16) Silicone rubber, mylar, pigment.
68.5”x56.5”. 2001

17) Silicone rubber, mylar, pigment.
68.5”x56.5”. 2001 (detail)

Subscribe to:
Posts (Atom)
